The short answer
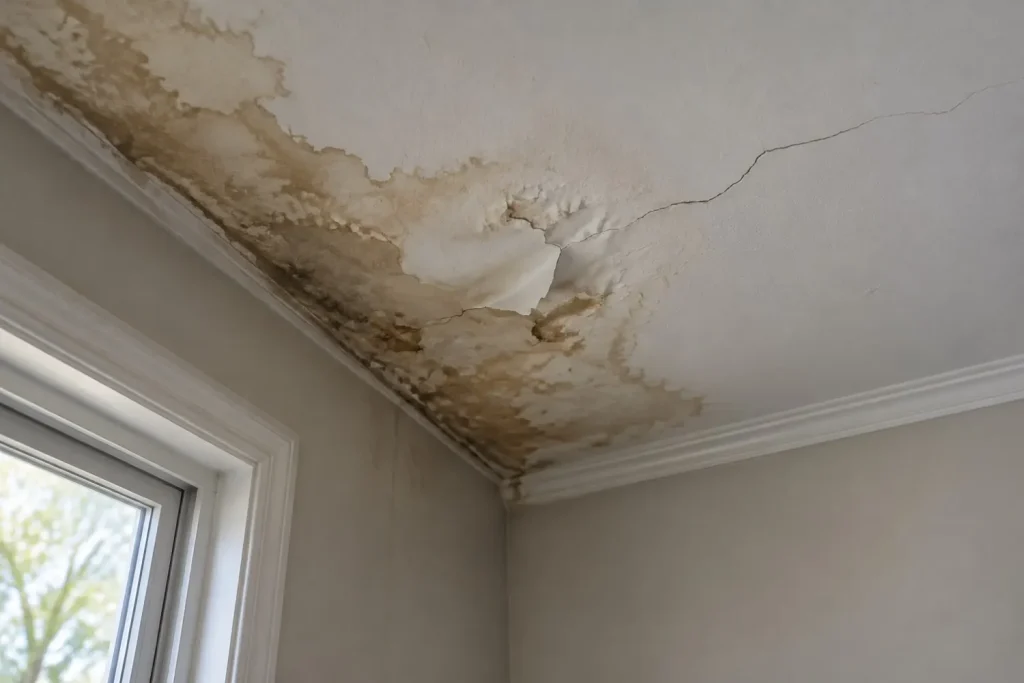
Water damage ceiling problems are never cosmetic at the point you can see them, because a visible stain means water has already travelled through a structure to reach the surface. Repair runs roughly $150 to $400 for stain-blocking and paint, $400 to $900 for a small patch, $900 to $2,500 to replace a section, and $2,500 to $6,000 or more for a full ceiling with insulation. A sagging or bulging ceiling is a safety matter, not a decorating one.
Key takeaways
- Diagnose upward before you price anything. What sits directly above the stain answers most of the question: a bathroom, a roof, an HVAC condensate line, or a pipe run.
- Sagging, bulging or bowing means saturated material is carrying weight it was never designed to carry. Do not stand under it and do not poke it.
- The stain edge is evidence. A sharp ring suggests one event that has since dried; a soft spreading edge suggests active or repeated wetting.
- Painting over a stain without fixing the source is the single most common and most expensive mistake on this subject. Stain-blocking primer hides the evidence, not the water.
- Wet insulation above a ceiling gets removed, not dried in place. It holds water, loses its R-value while wet, and stays wet long after the plasterboard around it has dried.
On this page
- What a ceiling stain actually means
- Diagnose by what is above it
- When it is urgent
- Reading the stain: colour, edge and shape
- Plasterboard, plaster and lath behave differently
- The insulation above it
- What repair costs
- What moves the number
- The universal mistake
- When it becomes a mould question
- Category, and why the ceiling route matters
- Coverage on a ceiling loss
- What a proper repair sequence looks like
- Questions people actually ask
A wall stain is usually water arriving from beside it. A ceiling stain is water arriving from above it, which means it has passed through a floor assembly, a roof assembly or a service void before it reached the paint. Everything it touched on the way is wetter than the part you can see, and the visible mark is the end of the story rather than the beginning.
What a ceiling stain actually means
For a stain to appear, water has to saturate the ceiling material from above and carry dissolved compounds through it to the painted face. That takes volume, or time, or both. By the time the mark is visible from a sofa, the assembly above has been wet for a while.
This is why the honest answer to the question is almost never that the ceiling needs painting. The ceiling is a symptom. The actual questions are what wetted it, whether that thing is still doing it, and what else got wet on the way.
The visible mark understates the wet area
Water spreads along the top face of a ceiling until it finds a penetration, a joint or a low point, then comes through there. The wetted area above is routinely larger than the stain below, and sometimes the stain is not even under the leak. A light fitting, a downlight cut-out or a plasterboard seam will collect and release water some distance from where it arrived.
Diagnose by what is above it
The most useful diagnostic question costs nothing: what is directly above this spot, and one room over from directly above it? Four sources account for the overwhelming majority of ceiling stains, and each leaves a different signature.
| What is above | Likely cause | What confirms it | What rules it out |
|---|---|---|---|
| A bathroom or en-suite | Shower pan or tray failure, waste pipe joint, failed seal at the trap, or grout and sealant letting water through the floor | Stain grows during or shortly after showering, and is strongest under the shower or the trap rather than under the basin | No change in the stain after a week of no showers upstairs |
| A kitchen or laundry | Supply line, waste trap, dishwasher or washing machine connection, or an overflowing appliance | Stain tracks to appliance use, often with a soapy or detergent residue at the edge | Stain continues to grow with the appliances isolated |
| Roof directly, or an attic | Failed flashing, lifted or missing covering, a roof valley, or a penetration at a vent stack, chimney or skylight | Stain appears or grows only after rain, and usually after wind-driven rain from one direction | Stain grows in settled dry weather |
| An attic or upper cupboard with HVAC plant | Condensate drain pan overflow, a blocked condensate line, or condensation on uninsulated ductwork | Appears in cooling season with the system running, and stops when it is switched off | Appears in winter with the cooling off |
| Another floor with plumbing running through the void | Supply line or waste pipe in the joist space, not necessarily under a wet room | Continuous slow growth unrelated to weather or fixture use, often with the water meter moving | Meter static with all fixtures closed |
| An exterior wall junction | Wind-driven rain past a failed seal, a gutter overflowing back under the eaves, or an ice dam in cold climates | Stain sits at the wall-to-ceiling junction and follows storms from one direction | Stain sits in the middle of the room away from any wall |
The cheapest test is a week of elimination
Where the source is genuinely unclear, controlled elimination beats guessing. Mark the stain edge in pencil with the date. Stop using the suspect fixture for several days and see whether the mark moves. Watch what happens after the next heavy rain. Check the water meter with every fixture closed. Three of those four cost nothing and each one removes a whole branch of the table above.
Two sources at once is more common than people expect
An older property can have a slow roof leak and a failing shower seal in the same ceiling. If fixing one obvious source leaves a stain that still grows, that is not a failed repair, it is a second source. This is one of the reasons a proper water damage inspection maps moisture across the whole assembly rather than at the one spot somebody pointed at.
When it is urgent
Most ceiling stains are a problem for this week. A few are a problem for the next ten minutes, and the difference is visible from the floor.
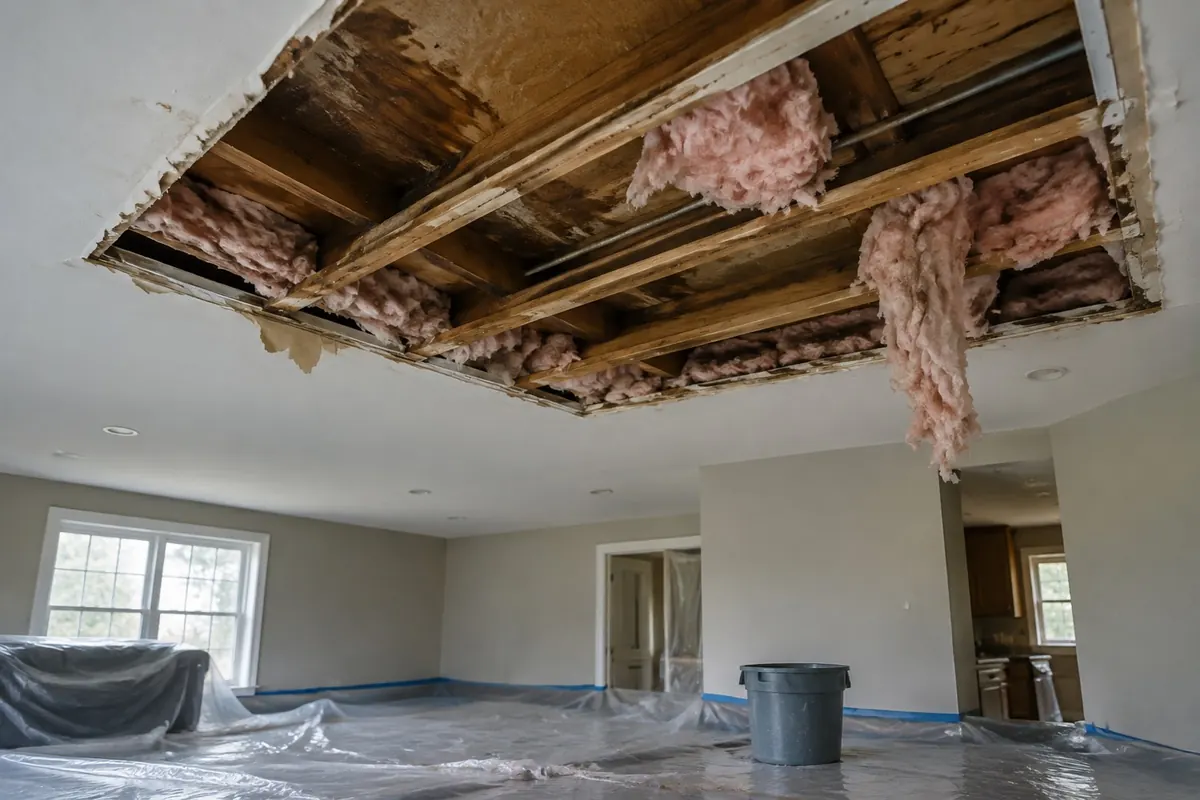
If the ceiling is sagging, bulging, bowing or dripping: leave the room and keep people out of it. Saturated plasterboard or plaster gets very heavy and can come down in one piece rather than crumbling gradually. Do not stand under it. Do not poke it to see how soft it is. If water is near a light fitting, a downlight or a ceiling fan, switch off that circuit at the consumer unit rather than using the wall switch.
| What you can see | What it indicates | What to do |
|---|---|---|
| A dry-looking stain with a sharp edge, unchanged for months | A past event that has since dried out | Confirm it really is dry with a meter reading, then establish the source was fixed before decorating. |
| A damp patch with a soft edge that is growing | Active or repeated wetting, source still live | Find the source. Do not decorate. Mark and date the edge to confirm growth. |
| Visible sagging or a bulge holding water | The material is saturated and carrying weight it cannot support | Keep everyone out of the room and isolate the circuit. This is a call now, not a call tomorrow. |
| Active dripping | Water is arriving faster than the ceiling can hold it | Contain below if you can do it safely from outside the room’s footprint, isolate the water supply if plumbing is the source. |
| A dark grey or black patch | Sustained wetting, possible growth on or behind the surface | Investigate rather than paint. See the mould section below. |
| Cracking radiating from one point, or nail and screw pops | The board has moved as it took on water and dried | Treat as a moisture question first and a filler question second. |
Reading the stain: colour, edge and shape
A stain carries more information than most people take from it. Two features do the work: the edge tells you about time, and the colour tells you about what the water passed through.
The edge is a timeline
| Edge character | What it usually indicates | Practical reading |
|---|---|---|
| Sharp, well-defined ring, often with a darker line at the boundary | A single wetting event that then dried. The ring is where the wetted area stopped and the dissolved material concentrated as it evaporated | Likely historic. Confirm dryness with a meter before assuming the source is gone. |
| Concentric rings, like a tide mark | Repeated wetting and drying cycles, each one leaving a boundary | An intermittent source: rain-driven, seasonal, or tied to a fixture that is used irregularly. |
| Soft, diffuse, spreading edge with no clear boundary | Currently wet or very recently wetted. The water front is still moving | Active. Treat as live until proven otherwise. |
| A narrow run or streak rather than a patch | Water tracking along a joist, a pipe or a board joint before coming through | The source is often some distance from the visible mark. Follow the line uphill. |
| A stain centred exactly on a light fitting or downlight | Water collecting on the ceiling and discharging at the easiest opening | Says nothing about where the leak is, only where the hole is. Also an electrical issue. |
Colour narrows the source
- Yellow to tan to brown. The most common by far. These are tannins and other compounds leached out of timber, old plaster, adhesive or the board’s own paper facing and deposited at the surface as the water evaporated. Colour intensity tracks how much material the water passed through, not how dirty the water was.
- Reddish or rust-coloured. Often contact with ferrous metal on the way: old nails, fixings, a steel duct or a pipe clip. Also common where galvanised plumbing is corroding.
- Grey. Frequently a marker for contaminated water rather than clean supply water, or for dust and soot in an attic being carried through.
- Dark grey to black, particularly with a fuzzy or speckled texture. Warrants investigation rather than a coat of paint. It can be growth on the surface or coming through from behind.
- White or chalky deposits. Efflorescence: mineral salts left behind as water evaporated, usually from plaster, concrete or masonry above.
Plasterboard, plaster and lath behave differently
What the ceiling is made of changes both the failure behaviour and the repair decision, and it is the second question a contractor should ask after where the water came from.
| Ceiling type | How it behaves wet | Repair implication |
|---|---|---|
| Plasterboard, painted | The gypsum core absorbs readily and the paper facing delaminates. It loses strength quickly and sags under its own wet weight | A saturated section is generally cut out and replaced rather than dried in place. A lightly stained but structurally sound section can often stay. |
| Plasterboard with a textured or sprayed finish | Same as above, plus the texture makes an invisible patch harder | Often pushes toward replacing a larger area or the whole ceiling so the finish matches. |
| Traditional lath and plaster | More tolerant of brief wetting than plasterboard, but sustained wetting causes the plaster keys behind the lath to fail | Can look fine and still have lost its mechanical key. Failure is then sudden. Specialist repair, and more expensive per square metre. |
| Suspended or grid ceiling tiles | Individual tiles sag, stain and give way. The grid itself usually survives | Cheapest of all to repair because tiles are replaced individually, but matching ageing tiles is the practical problem. |
| Timber-boarded or panelled | Swells, cups and stains; water runs between boards and spreads | Water passes through joints into the void, so the substrate above matters more than the visible boards. |
The insulation above it
On a top-floor ceiling with an attic above, or any ceiling with insulation in the void, the insulation is usually the largest single reservoir of water in the assembly and it is regularly overlooked. Our guide to the signs of mold in an attic covers what wet insulation and frosted nail points look like from the hatch.
Wet insulation gets removed rather than dried in place, for three reasons that all point the same way. It holds a great deal of water relative to its mass and releases it slowly. It loses thermal performance while wet, because the still air that does the insulating is displaced. And it sits on top of the ceiling with poor air movement around it, which is the slowest possible drying condition. Fibrous batts also compress and mat once wet and do not recover loft afterwards.
Leaving it in place is the classic route to a repaired ceiling that stains again a fortnight later, or to a mould problem sealed inside a void. The EPA mold cleanup guidance guidance is direct on the principle: controlling moisture is what controls growth, and material that stays wet is the problem to remove.
| Insulation type | Behaviour once wet | Usual disposition |
|---|---|---|
| Mineral wool or fibreglass batts | Absorb and hold water, compress, mat down and do not recover loft | Remove and replace the affected area. |
| Blown cellulose | Holds a large volume of water, clumps and settles permanently, and carries fire-retardant treatment that can wash out | Remove. Reinstating blown material means bringing equipment back in. |
| Rigid foam board | Does not absorb much itself, but traps water against the ceiling behind it | Often removable and reusable, but the assembly behind it has to be opened and dried. |
| Spray foam, closed cell | Resists water absorption and can conceal a leak above it completely | The hardest case to diagnose, because water travels laterally above the foam with no visible route. |
What repair costs
Ceiling repair prices in four fairly distinct bands, and which band you land in is decided by how much material has to come out rather than by how large the stain looks.
| Band | What is included | When it is the honest answer |
|---|---|---|
| Stain-block and repaint, $150 to $400 | Sealing primer over a dry, sound stain, then finish paint across the ceiling | Only where the source is fixed and the material is confirmed dry and structurally sound. This is genuinely correct sometimes; it is just used far more often than it applies. |
| Patch a small section, $400 to $900 | Cutting out a damaged area, fitting new board, taping, jointing, sanding and painting | Localised damage on plasterboard where the surrounding material is dry and sound. |
| Replace a section, $900 to $2,500 | Removing board across a larger area, checking and drying the joists, replacing insulation in that area, reboarding and finishing | Saturated material over a meaningful area, or a textured finish that cannot be patched invisibly. |
| Full ceiling with insulation, $2,500 to $6,000+ | Complete strip-out, insulation removal and replacement, full reboard, finish and paint, often with some electrical reinstatement | Widespread saturation, lath and plaster failure, or a textured or specialist finish where matching a patch is not realistic. |
These are ceiling repair figures, not whole-loss figures. Where water came through a ceiling it has usually also affected the floor above, the wall cavity, or the room below. For the mitigation and drying side of the same loss, our water damage restoration cost page sets out the per-square-foot bands by water category.
What moves the number
Two ceilings with identically sized stains can differ by a factor of ten. Six things account for almost all of that.
| Driver | Effect on cost | Note |
|---|---|---|
| How much material is saturated | Decides the band, from paint to full replacement | Measured with a meter, not estimated from the stain outline. |
| Ceiling height and access | Adds scaffolding or tower hire and slows every task | A stairwell or a double-height space costs materially more than a standard room. |
| Finish type | Textured, sprayed or specialist finishes push toward replacing the whole ceiling | Matching a texture across a patch is the usual reason a small repair becomes a big one. |
| Insulation above | Adds removal, disposal and replacement | Also adds the drying time for anything underneath it. |
| Electrical in the ceiling | Adds isolation, testing and sometimes replacement of fittings | Downlights and fans in a wetted ceiling are checked rather than assumed serviceable. |
| Whether the source fix needs the same access | Can reduce total cost if sequenced together | Opening a ceiling once for both the pipe and the repair is cheaper than opening it twice. |
The universal mistake
There is one error that accounts for more repeat ceiling damage than everything else combined: painting over the stain without fixing what caused it.
It is an appealing mistake because it works, briefly. Stain-blocking primer is designed to stop tannins bleeding through, and it does that well. The ceiling looks perfect. What has changed is that the only visible indicator of an active leak has been removed, so the next few weeks or months of wetting happen with nothing to see.
When it reappears, three things are worse. The wetted area is larger, because it kept spreading. The material has been wet for longer, so what might have been a patch is now a replacement. And any growth in the void has had an uninterrupted run in dark, damp, still conditions.
The sequence that is actually correct
- Find the source. Not the likely source. The confirmed source, established by elimination or by instruments.
- Fix the source and verify the fix. Run the fixture or wait out a rain event and confirm nothing new arrives.
- Open up and dry what is wet. Including the insulation, which means removing it rather than aiming a fan at it.
- Confirm dry with readings. Against comparable unaffected material, not against a guess.
- Then repair, then decorate. In that order, with stain-block used on a dry ceiling to stop residual tannins bleeding, which is what the product is actually for.
If you are certain the source was resolved long ago and the material is dry, painting is the right answer and stain-block is the right product. The problem is not the primer. The problem is reaching for it before the first four steps.
When it becomes a mould question
The EPA mold cleanup guidance guidance treats moisture control as the governing factor: where materials stay wet, growth follows, and the remedy is removing the water source and drying or removing the material. A ceiling void is close to ideal conditions for that, because it is dark, still and often insulated on top.
The practical signals that a stain has become a growth question are a dark grey or black patch rather than a tan one, a musty odour that is strongest near the ceiling, growth visibly spreading beyond the water mark, or a stain that reappeared after being painted over and is now larger. None of those are diagnoses on their own, and surface appearance cannot distinguish growth from staining reliably.
Cost-wise, this is where the numbers on this page stop applying. Remediation adds containment, controlled removal and verification on top of the ceiling repair. Our mould remediation cost page covers that scope separately.
Category, and why the ceiling route matters
ANSI/IICRC S500 classifies water losses by contamination. On a ceiling loss, the route the water took is part of that assessment, because water that started clean does not necessarily stay clean once it has passed through a building assembly.
| Source above | Category at the source | What the ceiling route can do |
|---|---|---|
| Supply line in a floor void | Category 1, clean | Passing through dusty insulation, old timber and accumulated debris can move it up the scale, and standing beyond roughly 72 hours does so regardless. |
| Shower or bath waste | Category 2, grey at best | Already contaminated at source. Porous material below is generally removed rather than dried. |
| Toilet waste line | Category 3 where it carries solids or sewage | Full contaminated-water handling below, including removal of porous materials. |
| Roof leak, rainwater | Category 1 before contact | Contact with roofing materials, attic dust and debris routinely moves it up. Wind-driven rain carrying debris is treated as contaminated. |
| HVAC condensate | Category 2 in general | Condensate has passed across a coil and through a pan and is not treated as clean water. |
Coverage on a ceiling loss
The general pattern in standard homeowners policies is that sudden and accidental discharge is covered and gradual leaks and maintenance failures are not. Ceiling stains sit awkwardly across that line more often than most losses do, precisely because a visible stain implies the water was arriving for some time before anyone saw it.
- A pipe that burst upstairs is a clean example of sudden and accidental, and the resulting ceiling damage is generally covered. Our burst pipe repair page covers that case end to end.
- A shower seal that failed slowly is where most disputes live, because it is arguably a maintenance item that deteriorated over time.
- Roof leaks usually turn on whether the roof itself was damaged by a covered peril such as a storm, or had simply worn out.
- The component versus the damage distinction applies here as elsewhere: the policy typically pays for the ruined ceiling and not for the failed pipe, seal or roof covering that let the water in.
Photograph the ceiling before anyone opens it, and mark and date the stain edge as soon as you notice it. A dated sequence showing a stain that appeared and grew over a short period is the most useful evidence available for the sudden-versus-gradual question, and it only exists if someone starts recording early. Our coverage guide covers the distinctions in more detail. This is general information, not coverage advice.
What a proper repair sequence looks like
From first sighting to finished paint, a correctly handled ceiling loss runs through six stages. Skipping any of the first four is how repeat damage happens.
| Stage | What happens | How you know it was done |
|---|---|---|
| 1. Make safe | Isolate affected electrical circuits, keep people out from under any sagging area, contain active dripping | The circuit is off at the board, not just at the switch. |
| 2. Diagnose | Identify and confirm the source, map the extent of wetting with meters rather than by eye | You get a moisture map or at minimum a set of readings, including a baseline on unaffected material. |
| 3. Fix the source | Plumbing repair, roof repair, condensate line clearance, seal replacement | The fix is verified by running the fixture or waiting out a rain event. |
| 4. Open and dry | Remove saturated board and insulation, set drying equipment, monitor daily | Daily readings trending down toward the dry standard, not a fixed number of days. |
| 5. Verify dry | Final readings on the assembly against comparable unaffected material | A documented final reading. Closing up before this is how a repair becomes a mould job. |
| 6. Rebuild and decorate | Reboard, tape, joint, sand, stain-block if needed, paint | The stain-block is going onto a dry ceiling, which is the only time it belongs there. |
Questions people actually ask
How much does it cost to fix water damage on a ceiling?
Indicatively $150 to $400 for stain-blocking and repainting a dry, sound ceiling, $400 to $900 to patch a small damaged section, $900 to $2,500 to replace a section, and $2,500 to $6,000 or more for a full ceiling including insulation. Those are repair-only ranges compiled from published contractor price guides current in 2026, and they exclude fixing the source and any drying scope.
Is a water stain on the ceiling dangerous?
The structural concern is the real one: saturated plasterboard or plaster becomes heavy and can come down as a piece, so a sagging or bulging ceiling should be kept clear of and not prodded. The other practical risk is electrical, because water reaches light fittings and downlights, so isolate that circuit at the consumer unit.
Can I just paint over a water stain on the ceiling?
Only if the source is confirmed fixed and the material is confirmed dry and sound. Stain-blocking primer will hide the mark either way, which is the problem: it removes the only visible indicator that water is still arriving, so the damage continues unobserved and comes back larger.
How do I tell whether a ceiling stain is old or active?
The edge is the best free clue. A sharp, well-defined ring usually means a single event that has since dried, while a soft spreading edge usually means current or recent wetting. Mark the outline in pencil with the date and check it after a week and after the next heavy rain. A moisture meter settles it properly.
Does the insulation above need replacing?
If it got wet, generally yes. Insulation holds a large volume of water relative to its mass, dries very slowly in a still void, and loses thermal performance while wet. Fibrous batts also compress and mat once wet and do not recover their loft, so drying in place leaves both a wet reservoir and a degraded material.
What if the stain came back after I painted it?
That means the source was never fixed, or there is a second source. It is common to have both a roof issue and a plumbing or seal issue feeding the same ceiling. At that point the wetted area has expanded, so expect the repair to have moved up a band from wherever it started.
Should I open the ceiling to look?
A controlled inspection opening made by someone who knows what runs through that void is often the fastest route to a diagnosis, and it is usually cheaper than repeated guessing. Making a hole in a sagging ceiling that is holding water is a different proposition entirely and is not a do-it-yourself task.
Sources
- Institute of Inspection, Cleaning and Restoration Certification, ANSI/IICRC S500 Standard for Professional Water Damage Restoration, 5th edition, 2021. Water category framework and the structure of inspection, drying and verification. The standard text is sold by IICRC; we describe its framework rather than reproduce it.
- EPA mold cleanup guidance. United States Environmental Protection Agency, on moisture control as the governing factor in growth and on removing materials that stay wet. Retrieved 23 September 2026.
- Repair cost bands are compiled from published contractor and aggregator price guides current in 2026. They are indicative rather than survey results. We have not conducted a contractor pricing survey; when we do, its sample and method will be published with it.
- Diagnostic signatures, stain morphology, ceiling material behaviour and insulation behaviour are compiled from published restoration and building science guidance.
- Coverage descriptions reflect general patterns in standard United States homeowners policy forms. They are not coverage advice and every policy differs. See our coverage guide.
- Our methodology sets out the standing rules on what we publish as compiled ranges versus measured data.