The short answer
Hardwood floor water damage repair turns on two things: reading the board shape correctly, and not sanding until the floor has actually reached equilibrium. Cupping, where board edges sit higher than centres, means moisture from below and is the normal water-loss signature. Crowning, where the centres sit higher, very often means somebody sanded the floor flat while it was still wet. Specialty drying runs roughly $3 to $8 per square foot, refinishing roughly $3 to $8, and replacement roughly $8 to $25 installed.
Key takeaways
- Do not sand a cupped floor. Sanding removes material from the raised edges, and when the floor finally flattens it is crowned, thinner, and may no longer have enough wear layer to correct.
- Cupping is moisture from below. Crowning is usually a sanding error, or moisture arriving from above onto an already-dry floor.
- Wood commonly takes weeks to reach equilibrium (NDSU Extension: drying soaked wood may take weeks), against the 3 to 5 days SERVPRO gives as an average dry-out. Then it wants more time before refinishing.
- Mats and injection systems are the reason hardwood gets saved at all. They also explain why hardwood costs more per square foot to dry.
- Engineered board has a thin wear layer over a plywood core. Core delamination is usually terminal; solid board has recoverable thickness.
- The subfloor is the hidden question. A wet subfloor under a dry-looking floor means the floor cannot be assessed yet.
On this page
- Cupping against crowning
- Do not sand until it is dry
- Why wood moves at all
- Mats, injection and why this costs more
- The timeline is weeks, not days
- Engineered against solid
- The subfloor is the hidden question
- How the floor gets assessed
- What it costs
- When the floor cannot be saved
- Refinishing, and when to start
- What goes wrong
- Questions people actually ask
Wood flooring is where the drying decision is least reversible and most often rushed. Everything else in a water loss either dries or goes in a skip. A wood floor can be saved, ruined, or expensively half-saved, and the difference is measured in weeks of patience rather than in technique.
Cupping against crowning: read the shape first
Run a straight edge across the boards, against the grain, and look at the light under it. The shape of the deflection tells you where the moisture came from, and whether somebody has already made the expensive mistake.
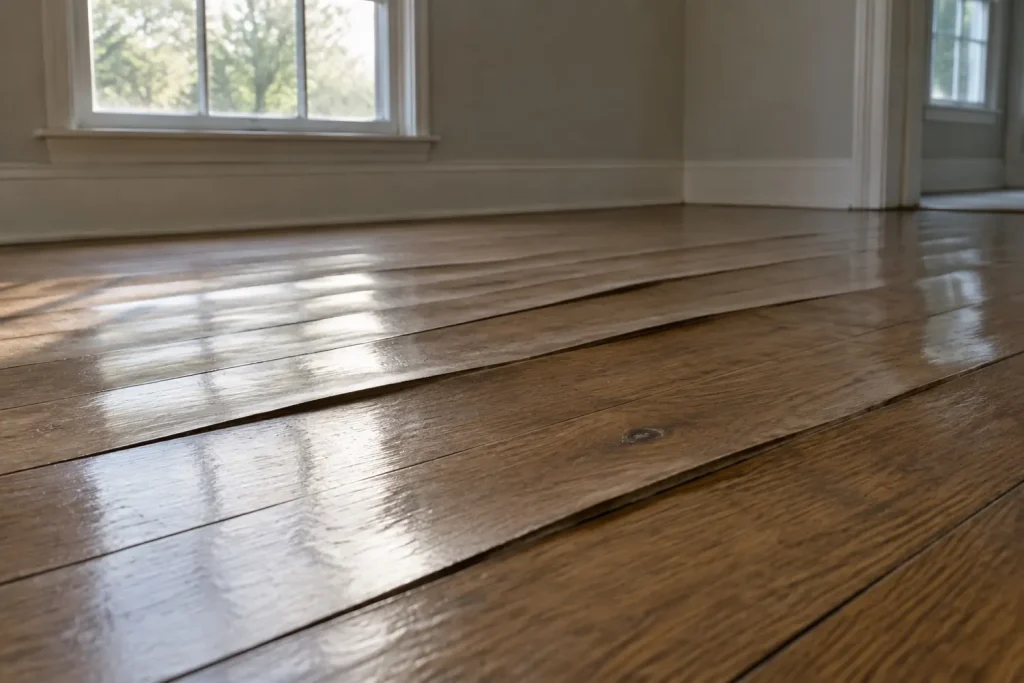
Cupping: edges higher than centres
Cupping is the classic signature of a water loss. Water reaches the underside of the boards, whether from a spill that soaked in at the seams, a leak in the space below, or a wet subfloor. The bottom of each board takes on more moisture than the top, swells more, and the board deflects so its edges rise. A cupped floor has a moisture gradient through its thickness. It has not necessarily failed.
Crowning: centres higher than edges
Crowning is the inverse shape, with two common routes to it. One is moisture arriving at the top surface of a floor whose underside is dry, which is uncommon in a water loss. The other, far more common afterwards, is that the floor was cupped, somebody sanded it flat to make it look right, and then it dried. The previously raised edges, now sanded away, sat lower than the centres.
Buckling, and why it is a different problem
Buckling is boards pulling free of the subfloor and lifting. It is a mechanical failure rather than a moisture gradient: the floor expanded, the perimeter expansion gap was insufficient or blocked by trim, and the only direction left was up. Buckled boards have broken their fastening and do not return.
Do not sand until the floor is dry
A cupped floor looks like it needs sanding, because sanding is what flattens a floor. Sanding one that has not reached equilibrium is the most expensive error available on a hardwood water loss, and it is usually made in good faith by somebody trying to be helpful quickly.
The mechanism is straightforward. A cupped board is deflected because its underside holds more moisture than its top. Sanding flat cuts wood off the high edges. The gradient then equalises over the following weeks, the board relaxes toward flat, and the edges that were cut down sit below the centres. The floor is crowned, thinner, and may not have the wear layer left for a second correction.
| Sequence | What happens to the board | Where you end up |
|---|---|---|
| Dry first, then sand | Gradient equalises, most of the cup relaxes out on its own, and what remains is sanded off a stable board. | Flat floor, wear layer spent once, correct outcome. |
| Sand first, then dry | Raised edges are cut away while the gradient is still present, then the board relaxes flat with the edges now low. | Crowned floor, thinner, and possibly not correctable again. |
| Sand, dry, sand again | Two passes of wear layer spent to fix a problem the first pass created. | Sometimes possible on solid board with thickness left. Rarely possible on engineered. |
How much cup relaxes out without any sanding at all surprises most people. A floor that looked badly cupped at week one is frequently close to flat by week four, needing a light screen and recoat rather than a full sand. That outcome is only available to a floor that was left alone while it dried.
Why wood moves at all
Wood is hygroscopic: it exchanges moisture with the surrounding air until the two balance, and it changes dimension as it does. That balance point is the equilibrium moisture content, and it moves with the temperature and humidity of the space.
Two consequences govern the whole job. A wood floor has a correct moisture content for the building it sits in rather than an absolute one, so the drying target is that number and not zero. And wood moves far more across the grain than along it, which is why a wet floor cups and buckles rather than getting longer.
Over-drying is a real failure mode
Pushing a floor below the moisture content the building will hold does not make it safer, it makes it shrink, and when the building returns to normal humidity the floor moves again. Gaps appearing after an aggressive dry are the symptom. The target is the equilibrium the building sits at, read from unaffected flooring, which is also the baseline ANSI/IICRC S500 requires for any dry standard.
Species and cut change how much it moves
Species differ in how much they move for the same moisture change, and quartersawn board moves less across its width than plainsawn board of the same species. Wider boards also show more total movement, because the same percentage change acts across more width. A wide plank cups more visibly than a narrow strip in the same room under the same wetting.
Mats, injection, and why hardwood costs more
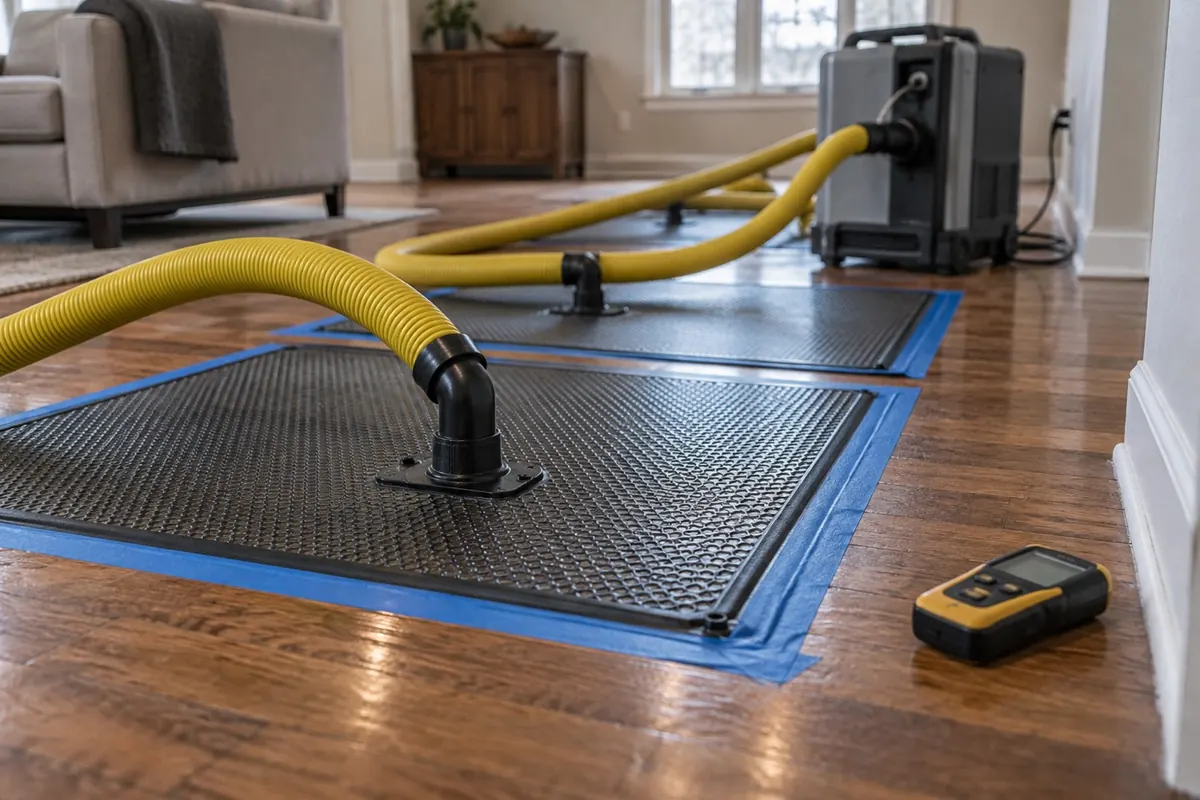
Air movers and a room dehumidifier dry the top surface of a wood floor and do very little for the water underneath it. The finish resists vapour movement and the water is on the wrong side. Two categories of specialty equipment exist to solve this, and they are why a hardwood floor gets saved at all.
| System | How it works | Where it fits | What it needs |
|---|---|---|---|
| Floor drying mats with vacuum | Sealed mats are laid on the floor surface and a vacuum unit pulls air and moisture up through the boards and the seams, reversing the direction of vapour movement. | Solid and engineered board over any subfloor, including slab. | A floor whose surface can be sealed to the mat, and boards intact enough to allow flow through the seams. |
| Injection or panel systems | Dry air is forced into the space beneath the flooring, through the subfloor cavity or under a panel assembly, so the underside dries from below. | Floors over a joist cavity or an accessible crawl space. | Access to the cavity, and a route for the humid air to leave. |
| Conventional air movers and dehumidifier | Surface evaporation from the top face, with humidity removed from the room. | Always runs alongside a specialty system, never instead of one. | A closed space. Windows open means importing humidity. |
| Below-floor drying from a crawl space | Equipment set in the space beneath and directed at the underside of the subfloor. | Where the crawl space is accessible and the wetting came from below. | An accessible crawl, and control of the crawl space humidity itself. |
This equipment is more expensive to own, slower to set and monitor, and runs longer than a standard dry, which is the whole explanation for the higher per-square-foot rate. An estimate that prices a wood floor at carpet rates is either not planning to dry it properly or not planning to save it.
The timeline is weeks, not days
A contained clean-water loss on carpet, drywall and a plywood deck typically finishes in 3 to 5 days, the average SERVPRO gives for a structure. Wood does not, and the gap is the biggest source of friction between owners, contractors and adjusters on these jobs. The floor commonly needs weeks to reach equilibrium, as NDSU Extension notes for soaked wood, then further time sitting stable before anyone touches it with a sander.
| Stage | What the source says | Source |
|---|---|---|
| Average structure, contained water loss | 3 to 5 days | SERVPRO FAQ |
| Wood soaked by water | Drying may take weeks | NDSU Extension |
| Wood flooring | Up to several weeks to dry completely | Nydree Flooring |
| When drying is finished | Readings match unaffected material | ANSI/IICRC S500 dry standard |
Why the equipment comes off before the floor is done
The specialty system comes off once the free water is gone and the floor is no longer at risk. The floor then equilibrates on its own for another couple of weeks at normal building conditions. The equipment leaving is not the job finishing; the readings finish it.
The waiting is the work
Nobody is paid for the fortnight in the middle, which is exactly why it gets compressed. A contractor with a crew booked and an owner who wants their house back both have reasons to start sanding at week two. The floor does not care, and the cost of being wrong is a crowned floor with less thickness left to fix it.
Engineered against solid
The two constructions look identical once installed and behave very differently when wet, so identifying which is on the floor is one of the first things an assessment should establish.
| Attribute | Solid hardwood | Engineered |
|---|---|---|
| Construction | One piece of wood through the full thickness, typically three quarters of an inch. | A thin wear layer of real wood laminated over a plywood or composite core. |
| Recoverable thickness | Substantial. Multiple sand-and-refinish cycles are possible over the life of the floor. | Limited to the wear layer, which on many products allows one light sand or none at all. |
| Cupping behaviour | Cups as a single piece and commonly relaxes as the gradient equalises. | The wear layer and the core respond differently, so movement is less predictable. |
| The terminal failure | Core breakdown is rare. Buckling and split boards are the usual write-offs. | Core delamination, where the plies separate. This does not recover and is not repairable. |
| Realistic outcome after a save | Dry, allow to stabilise, sand and refinish. | Dry, allow to stabilise, then screen and recoat if the wear layer allows it, or replace. |
How to tell which one you have
Look at an exposed edge: a floor vent, a threshold, or the gap at a stair nosing. Solid board shows continuous grain through the full thickness. Engineered board shows ply lines, a thin top layer over a striped core. Where no edge is visible, a board is lifted somewhere hidden rather than guessed at.
The subfloor is the hidden question
The finish floor cannot be assessed while the subfloor beneath it is wet, and this is the most common reason an assessment gets made too early. A floor sitting on a saturated deck is being continuously re-wetted from underneath, so its readings measure the deck rather than the floor.
| Assembly beneath | Behaviour | What it changes |
|---|---|---|
| Plywood or OSB over a joist cavity | Absorbs and releases slowly, and the cavity beneath holds humid air that keeps feeding the deck. | The joist cavity usually has to be dried too, from below where possible. |
| Concrete slab | Releases moisture for a very long time and can transmit moisture vapour from the ground upward. | A slab moisture test before reinstalling any wood, and an intact vapour retarder. |
| Existing floor over a crawl space | Crawl space humidity feeds the underside of the assembly continuously. | Crawl space conditions may have to be controlled before the floor will stabilise at all. |
| A second floor over a ceiling below | Water that passed through the assembly has wet the joists, the insulation if present, and the ceiling board underneath. | Two rooms in scope, and the ceiling below becomes its own dry-or-cut decision. |
Where the water travelled down through a floor assembly, the ceiling underneath is in scope and faces the same question. Our wet drywall guide covers the cut height and the insulation test that settles it.
How the floor gets assessed
A defensible hardwood assessment has a specific shape, and an estimate that skips it is guessing about the most expensive material in the room. It contains:
- A baseline moisture content from unaffected flooring of the same species and construction in the same building, read the same day. There is no defensible dry standard without it.
- A moisture map, readings at grid points across the affected area rather than one spot, because the wettest point governs the dry.
- Subfloor readings, taken through the floor with a long-probe meter or from below where the cavity is accessible.
- Board shape recorded with a straight edge, so the cup is documented at the start and its relaxation shown over time.
- Construction identified, solid or engineered, and the wear layer estimated where it is engineered.
- Cause and category of the water, because a contaminated source changes the answer however well the floor is drying.
Our inspection guide covers what an assessment should produce across the whole loss, and our drying duration guide covers why the answer is a reading, not a number of days.
What it costs
Wood flooring is priced on three separate scopes, and a quote that blends them is hard to evaluate. Drying is mitigation. Refinishing and replacement happen afterwards, and only one of those two applies.
| Scope | What it includes | What moves the number |
|---|---|---|
| Specialty drying | Mats or injection equipment, set, monitored and demobilised, plus the conventional air movers and dehumidification running alongside. | Area, duration, and whether the subfloor and cavity also need equipment. |
| Sand and refinish | Full sand to remove residual cup, edge work, and finish coats. | Species hardness, floor area, finish type, and whether the whole floor has to be done for a match. |
| Screen and recoat | A light abrasion of the existing finish and a fresh coat, with no material removed. | The cheap outcome, available only where the cup relaxed out and the finish is otherwise sound. |
| Replacement | Removal and disposal of the old floor, subfloor preparation, new material, installation, and finishing. | Species and grade, board width, whether it is site-finished or prefinished, and matching an adjoining run. |
| Feathering into an adjoining area | Weaving new boards into an existing run so the repair does not show as a rectangle. | Skilled work. Frequently the line that separates a good repair from a visible patch, and frequently missing from a cheap quote. |
Our cost guide explains why mitigation and reconstruction are priced on different rates, which is why a hardwood job carries two very different per-square-foot figures on one invoice.
When the floor cannot be saved
Specialty drying widens the salvage window considerably without making it universal. Some conditions mean continuing to dry is spending mitigation money on a floor that is already a replacement.
- Category 3 water. Contaminated water in the seams cannot be verified clean, and the principle that removes carpet pad removes the floor.
- Buckling over a meaningful area. Boards that have pulled off their fastening have failed mechanically.
- Engineered core delamination. Plies separating is terminal, and no amount of drying re-bonds them.
- Insufficient wear layer. If the thickness will not survive the sand needed to correct residual cup, the refinish route is closed even if the drying succeeded.
- A floor already near the end. One refinished several times may lack the thickness for another pass regardless of this loss.
- Split, crushed or stained boards in a species or grade that can no longer be matched, where a partial replacement always reads as a repair.
Refinishing, and when to start
Refinishing is the last step and has the clearest trigger. It starts when the floor has held a stable moisture content matching the baseline long enough to be confident the reading is the floor and not the weather, and when the residual cup has stopped changing between visits.
Screen and recoat against a full sand
If the cup relaxed out and the finish is intact, a screen and recoat abrades the surface and adds a coat without removing wood. It is the cheapest good outcome and it preserves thickness. A full sand is needed where residual cup or staining has to be cut away. That decision is made at the end of the dry, not the beginning.
Matching an adjoining run
Where only part of a continuous floor was affected, sanding just that area leaves a visible transition against the aged finish next to it. The usual answer is to refinish the whole continuous run so colour and sheen are uniform, which is why the refinish area on an estimate is often larger than the wet area.
What goes wrong
- Sanding before equilibrium. The one that produces a crowned, thinner floor.
- Conventional equipment only. Air movers on a finished floor dry the finish, not the wood under it.
- No baseline from unaffected flooring. No target moisture content, and no way to know when to stop.
- Over-drying. Pushing below the building’s equilibrium produces gaps when it returns to normal.
- Ignoring the subfloor. A wet deck keeps re-wetting the floor and makes every reading above it meaningless.
- Covering it to protect it. Plastic sheeting traps vapour against the surface and stalls the dry.
- Pulling the file closed when the equipment leaves. The floor moves for weeks afterwards, and that is where the refinish decision is actually made.
The same question runs through every material in a water loss. Our guides cover it for wet carpet, where the pad is the answer, and wet drywall, where the cut height is. Our methodology sets out how figures here are sourced.
Questions people actually ask
Can a cupped hardwood floor be saved?
Often yes. Cupping is a moisture gradient through the board rather than a failure, and much of it relaxes out as the floor reaches equilibrium, provided it is dried with specialty equipment and left alone for the weeks that usually takes.
Why should I not sand a cupped floor straight away?
Because sanding removes wood from the raised edges while the gradient is still present. When the gradient equalises the board relaxes flat, the cut-down edges end up below the centres, and the floor is crowned as well as thinner. On engineered board with a thin wear layer that outcome can be uncorrectable.
What is the difference between cupping and crowning?
Cupping is edges higher than centres, caused by moisture from below, and is the normal water loss signature. Crowning is centres higher than edges. In the aftermath of a water loss it usually means the floor was sanded flat while it was still wet.
How long does a hardwood floor take to dry after water damage?
Commonly weeks rather than days: NDSU Extension notes drying soaked wood may take weeks, against the 3 to 5 day average SERVPRO gives for a contained loss, then further time stable before refinishing. Duration is set by readings against a baseline, not by a fixed number of days.
What does hardwood water damage repair cost?
Specialty drying roughly $3 to $8 per square foot, refinishing roughly $3 to $8, and replacement roughly $8 to $25 installed, per published contractor price guides current in 2026. Drying is mitigation; the other two are reconstruction.
Can engineered wood flooring be dried and saved?
Sometimes, using the same mat and injection systems, but the limits are tighter. The wear layer is thin so a refinish may not be available, and delamination of the plywood core does not recover.
Do I need to dry the subfloor too?
Yes, and until it is dry the finish floor cannot be assessed, because the boards keep exchanging moisture with the deck beneath them. Readings over a wet subfloor describe the subfloor.
Sources
- Institute of Inspection, Cleaning and Restoration Certification, ANSI/IICRC S500 Standard for Professional Water Damage Restoration, 5th edition, 2021. Water categories, specialty drying of assemblies, and verification against a documented dry standard from unaffected material. Sold by IICRC; we describe its framework.
- Wood movement described here is standard wood science: wood is hygroscopic, exchanges moisture with the surrounding air to an equilibrium moisture content, and moves far more across the grain than along it. Cupping follows a gradient in which the underside is wetter than the top face.
- Cost ranges for specialty drying, refinishing and replacement are compiled from published contractor and aggregator price guides current in 2026, indicative rather than survey results. No contractor pricing survey was conducted.
- Duration ranges are indicative guidance compiled from published restoration and wood flooring trade material. Actual duration is set by readings against a baseline, not by elapsed time.